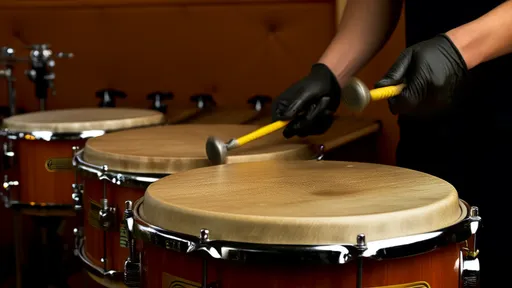
Walking into any music store’s percussion section, you’ll likely hear an experienced drummer advising a newcomer on one of the oldest and most persistent challenges in the world of acoustic drums: what to do when a drumhead gets wet. Moisture is the natural enemy of the drum, whether from humidity, rain, accidental spills, or even the player’s own sweat. A dampened drumhead loses tension, sounds flat and dead, and can feel unresponsive under the sticks. For a working musician, a gig-saving recovery isn’t just a handy trick—it’s an essential skill.
The science behind this is rooted in the material itself. Most modern drumheads are made from Mylar, a type of polyester film known for its durability and consistent tone. However, like many polymers, Mylar is susceptible to changes in humidity and temperature. When moisture is absorbed, the material temporarily expands and becomes more pliable, causing the carefully tuned tension to slacken. The key to recovery isn’t about brute force re-tuning, but a patient process of guiding the material back to its original state without causing damage.
The immediate aftermath of moisture exposure is critical. If a drum gets wet during an outdoor gig or in a humid environment, the first step is to remove it from the stand if possible. Wipe the surface gently with a soft, dry cloth to eliminate standing water. Avoid using heat sources like hairdryers or placing the drum near a radiator. Rapid, uneven drying can cause the Mylar to warp or shrink too quickly, leading to permanent wrinkles or even cracking. Patience, not speed, is your greatest ally here.
Once the surface moisture is gone, the real process begins. Loosen all the tension rods around the drum several full turns. This is a counterintuitive step for many, who instinctively want to tighten the head to regain pitch. However, by loosening the rods, you allow the damp head to contract evenly as it dries, preventing it from pulling against the hoop in an unbalanced way. This avoids creating weak spots or distorting the collar of the head where it meets the drum shell.
Now, let the drum sit. Place it in a room with stable, moderate temperature and good air circulation—not a damp basement or a hot attic. A dry living room or bedroom is ideal. This slow, ambient drying process might take several hours, or even a full day for a severely dampened head. You’re waiting for the Mylar to naturally release the moisture it has absorbed and return to its baseline physical state. Rushing this step is the most common mistake and the primary cause of heads that never quite sound right again.
After the waiting period, it’s time for the careful return to tension. Begin by finger-tightening all the tension rods until they are snug. Then, using a drum key, employ the classic star-pattern tuning method. Give each rod a half-turn, moving in a crisscross pattern opposite each lug. This ensures the pressure is applied evenly across the entire head. After a full round of half-turns, tap near each tension rod with a stick and listen. The goal at this stage is not to achieve your final pitch, but to achieve an even, consistent tone at each point around the rim.
Only when the head is perfectly even at a low tension should you begin to bring it up to your desired pitch. Continue the star pattern, now using quarter-turns, and frequently check the pitch at various points. A head that has been properly dried and re-tensioned will often hold its tune well, but it may require a few minor adjustments over the next 24 hours as it fully acclimates to its dry environment. This is normal and part of the settling process.
For the working drummer, prevention is always better than cure. Using cases for transport, keeping drums away from windows, air conditioners, and heaters, and using moisture-absorbing packets in storage areas can drastically reduce the risk of moisture-related issues. For musicians in consistently humid climates, considering hydraulic heads, which contain oil and are more resistant to moisture, might be a worthwhile investment for peace of mind.
Ultimately, the ability to nurse a damp drumhead back to health is a testament to a drummer’s understanding of their instrument. It’s a process that respects the physical properties of the materials and prioritizes gradual recovery over quick fixes. By mastering this technique, you ensure that a little water doesn’t derail a performance or ruin a valuable piece of gear, keeping the focus where it belongs: on the music.

By /Aug 22, 2025

By /Aug 22, 2025

By /Aug 22, 2025

By /Aug 22, 2025

By /Aug 22, 2025

By /Aug 22, 2025

By /Aug 22, 2025

By /Aug 22, 2025

By /Aug 22, 2025

By /Aug 22, 2025

By /Aug 22, 2025

By /Aug 22, 2025

By /Aug 22, 2025

By /Aug 22, 2025

By /Aug 22, 2025
By /Aug 22, 2025
By /Aug 22, 2025
By /Aug 22, 2025

By /Aug 22, 2025
By /Aug 22, 2025
